Month: June 2011

Playing Card Wallet

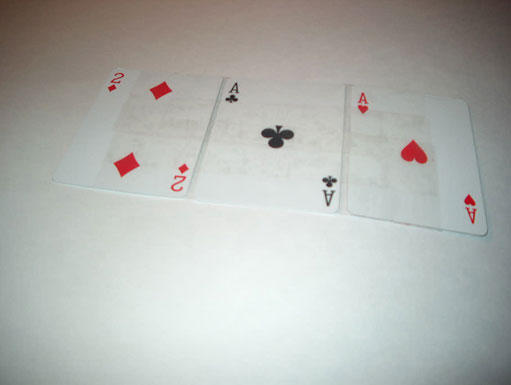
1) Find three playing cards you like. Lay them about 1/4 inch apart side-by-side with the faces towards you.

2) Tape the three cards together with clear packing tape.


3) Repeat this process to make another set of three playing cards.

4) Lay the two sets of cards beside each other (so that the cards make a 3 x 2 rectangle) with the faces towards you.

5) Connect the two pieces with clear packing tape.


6) Turn the cards over, and cover any sticky parts with tape (sticky part to sticky part).

7) Turn the cards over again, and fold the cards toward each other, so that the faces are pointing outwards.

8) Tape the two shorts sides together.

9) Three of the four sides should now be joined together. Your wallet is now complete, put your money in, fold it up, and put it in your pocket.

Water bottle drinking bowl for your dog

Walking-the-dogA simple solution to walking the dogs in an area with no water points.Basically two soda bottles one cut,in half lengthways.It then clips over the other.I sewed up a simple carrier and hey presto the dogs get that much needed drink of water on their walk.

So all you need is:

     two 2 liter bottles

     a cutter knife

    some webbing

    a quick release buckle

     a sewing machine and about 20 minutes

Tools-and-materials

Step by step instructions

Build Your Own Solar Sun Jar

Build your own Sun jar that collects and stores sunshine so that you can use it at night.

DIY sun jarComponents:
1. Ikea glass jar
2. Solar garden light
3. rechargeable battery (AA size)
4. Blu-tack
5. Tracing paper

Tools:
1. screwdriver
2. Utility Knife
3. Glass Frosting spray

Step A:
Rip open the innards of the solar garden light. I know that may sound ambiguous but you’d be able to use a utility knife and surgically dissect the relevent components out (see image). Solar garden lights are easily available at your local major hardware store. If you’re in Australia, try Dick Smith Powerhouse.

Step B:
Flip open the ikea jar and place the “solar garden light innards” as shown in the picture. Use blu-tack to keep it all together. Feel free to play around with the placements so the components would fit snuggly into the jar.

Step C:
Cut a strip of tracing paper and place it in the glass jar.
OR
Use a Glass Frosting spray .

Step D:
Close the lid of the glass jar with tender care and you’re done.

Step-by-step directions