
Use an old umbrella to create wings. Follow the complete instructions HERE
You can do it – Here's how!
Category: Holidays
Use an old umbrella to create wings. Follow the complete instructions HERE
Use a melon baller to make mini apples. Poke a hole into the center of the peel part. Insert a pretzel stick. Whip up your favorite caramel recipe, dip and sprinkle. Let dry in mini muffin cups. So cute!


complete step-by-step instructions HERE
Ingredients
8 apples
8 wooden skewers
2 cups granulated sugar
1 cup light corn syrup
½ cup hot water
½ teaspoon red food coloring
Candy thermometer
Method
Wash and dry the apples thoroughly and remove its stems carefully. Stick some wooden skewers in place of the apple stems and keep these apples aside. Line a baking sheet with aluminum foil and spray it with a nonstick cooking spray. Keep the baking sheet aside. In a saucepan, combine the water, sugar and corn syrup and place it on medium-high heat. Place a candy thermometer in the saucepan to check the heat. Stir it until the sugar starts to dissolve and once the mixture reaches a temperature of 250°F, leave it to cook for a while without stirring. Add the food coloring to the mixture and stir until it dissolves completely. Use a wet pastry brush to wash down the sides of the saucepan in case any crystallization occurs. Continue to cook the mixture until its temperature reaches 285°F. Then, remove from the heat and stir it to smooth it out. Pick an apple by the skewer, dip it in the candy mixture and rotate the apple to coat all the sides. Twirl the apple to remove the excess mixture and place it on the baking sheet. Repeat the same procedure with the remaining apples and allow them to cool thoroughly and enjoy them after a day.
 Open a hair pin. On a glass surface, ‘fill’ the pin with white glue. Drop on beads for eyes, and a mouth of cut paper. When glue is dry, carefully lift off glass. Hot glue a pin back to the back of ghost.
great idea via
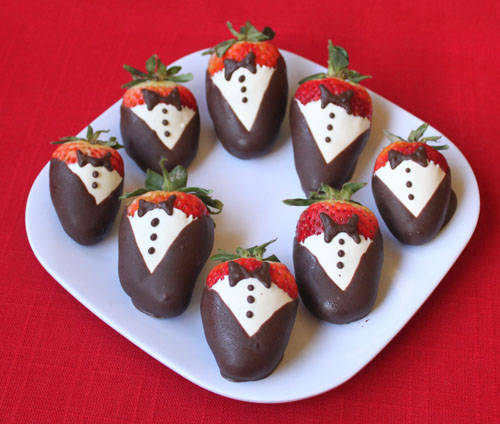
How adorable are these? This would be great for Bridal Parties or at a wedding reception. Here are the directions from pastry chef Elizabeth LaBau. Though the recipe seems long, it is only 4 basic steps. Love these.
1. Prepare a baking sheet by lining it with aluminum foil or waxed paper and set aside for now. Wash the strawberries and dry them carefully, as excess water can interfere with the dipping process.
2. Melt the white chocolate candy coating in the microwave, stirring after every 30 seconds to prevent overheating. Stir until the chocolate is completely melted and smooth.
3. Dip a strawberry into the white chocolate until it is almost submerged, but leave about 1/2-inch of undipped berry at the top. Allow excess chocolate to drip back into the bowl, and scrape the bottom of the berry against the lip of the bowl to remove excess white chocolate that might pool around the bottom of the berry. Place the berry onto the foil-lined baking sheet, and repeat with remaining berries, until all have been dipped in white chocolate.
4. Place the dipped berries in the refrigerator to set the white chocolate while you prepare the dark chocolate for dipping. Place it in a microwave-safe bowl and melt it, stirring after every 30 seconds to prevent overheating. Stir until the chocolate is completely melted and smooth.
5. Once the white chocolate is completely set on the berries, take one berry and dip it into the dark chocolate at a 45-degree angle, so that the chocolate covers one side of the berry on the diagonal. Now turn it in the opposite direction and dip the other side on a 45-degree angle. The final result should be a berry that has a white “V” of chocolate showing through a darker outer coating.
6. Allow excess chocolate to drip back into the bowl, and scrape the bottom of the berry against the lip of the bowl to remove excess chocolate that might pool around the bottom of the berry. Place the berry onto the foil-lined baking sheet, and repeat with remaining berries, until all have been dipped in dark chocolate.
7. Now it’s time to give your berries bow ties and buttons. To pipe these on, you can use a piping bag fitted with a small round attachment, a paper cone, or a plastic bag with the corner snipped off. Whichever method you choose, spoon some melted chocolate into your tool of choice. Make a bow tie by drawing two connected triangles at the top of the white V. Below this, place two or three dots for buttons. Repeat until all of your strawberries are decorated.
8. Place the tray back in the refrigerator to set the dark chocolate, for about 10 minutes. Your Tuxedo Strawberries are now ready to eat! They will keep in the refrigerator for several days, but I think they are best soon after they are made. If you do save them for 2-3 days, expect to see some condensation on them as they come to room temperature
