Category: Kids

Meatloaf Cupcakes

Recently I was house sitting for my cousin in Washington DC.  I was inspired to create this provocative meal from a photo my sister in-law sent.  Great idea for portion control.

The big decision I had to make was whether to go for a more bread-like base or a true meaty base.  Being the carnivore that I am, I went for meaty.  I was thinking it would be a meal not just filler.  Try using sweet potatoes or add garlic to the mashed potatoes.   Kids would love these don’t you think?

Recipe for Meatloaf Cupcakes

Makes 10 meatloaf cupcakes

INGREDIENTS

1 1/2 pounds lean ground beef

6 oz garlic flavored croutons  (reserve 10 for garnish)

1/2 cup ketchup

1/2 teaspoon salt

1/4 teaspoon ground pepper

1/4 teaspoon cayenne pepper

1/4 teaspoon chili pepper

2 large eggs, beaten

1 clove garlic

1/4 cup diced onion

1 carrot peeled and chopped

1/2 brown sugar for bottom of cups

GLAZE

1/2 cup ketchup

4 teaspoon
Complete Instructions HERE

Hula Hoop Rug

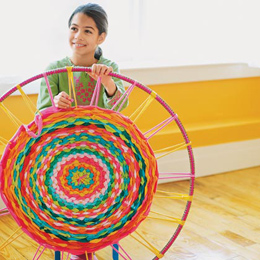
What does it take to transform a pile of old T-shirts into spectacular works of woven art? Just a spare hula hoop or embroidery hoop and the techniques we’ll show you here. The oversize looms and easy-to-use loops of T-shirt fabric make these projects particularly appealing to beginning weavers. Learn the basic hoop weaving technique by crafting a colorful accent rug to brighten up a room.

Before you begin, some terms you need to know: the warp is the material you string on the hoop, the weft is the material you weave with.

Materials
  • Scissors
  • About a dozen T-shirts
  • 33-inch hula hoop
 
Instructions
  1. null For the warp, cut 1-inch-wide loops from the bodies of one or two tees (we found a boy’s large worked best on our 33-inch hoop), removing the hem and stopping at the sleeves. Ideally these loops should all be the same color; we used two colors for clarity in our photographs. You’ll need a total of 11 loops. For the weft, cut at least 50 loops from the remaining shirts. Save the unused sleeves for the basket project.
  2. null Stretch one warp loop over the hula hoop, as shown.
  3. Step 3 Add and secure a second loop, perpendicular to the first.
  4. null Repeat, filling in the spaces, until all 11 loops are in place.
  5. null Push together two warp loops at the top of the hula hoop, as shown. This creates an odd number of warp spokes in your wheel, which allows the overunder pattern of the weft to alternate with each new row.
  6. Step 6 Secure the first weft loop to the center of one of the warp spokes (we chose the doubled spoke from step 5) by wrapping it around the warp and then looping it back through itself.
  7. null Begin weaving the weft over and under the warp spokes, forming a tight spiral. For now, treat both parts of each warp spoke as a single unit, weaving over or under the two together. As you work, push the weft material toward the center of the hoop and keep it just snug. If you pull the weft tight, the rug will develop lumps or bends. When you reach the end of the piece of weft, add a new loop by threading it through the end of the first and back through itself.
  8. null When your rug is about 8 inches across, begin treating each warp spoke as two individual strips instead of a single unit, weaving over or under each strand instead of going over or under the doubled spoke. This increases the number of warp spokes, improving the structure of the project. When you get to the two warp spokes that you pushed together at the top of the loom, separate them. Treat one of the spokes as two individual strips, but continue to treat the other as a single spoke. This maintains the odd number of warp spokes.
  9. null When the rug is the size you want, but no closer than 8 inches from the edge of the hula hoop, snip open your weft loop.
  10. null Tie the ends around a warp spoke, and tuck the ends into the rug.
  11. null Cut the warp spokes off the hoop one at a time.
  12. null Tie the ends in pairs, then trim them to make a fringe or tuck them back into the rug.
great idea via

Diaper Cake


Here’s What You’ll Need:

• 60 diapers (depends on how big you make it) You can use either disposable or cloth – better find out what the expectant mother would like. You can use either white or patterned diapers.

• Ribbon, 1/2 or 1 inch wide, patterned to fit the baby shower theme. Pink, blue, or yellow are good choices.

• Ribbon, 1/4 inch to tie rolled diapers with

• 36-60 small rubber bands (depending on how you want to “build” the cake

• 6 large rubber bands

• One 8-oz baby bottle or one large bottle of baby lotion

• One 4-oz baby bottle

• A cardboard or plastic cake platter

• Cake decorations – for example, baby confetti, baby sock roses, artificial roses, etc.

• Baby items – Pacifiers, bottles, lotion, bibs, receiving blankets, miniature stuffed animals, baby towel, onesie, wash cloths, baby hygiene products, toys, etc.

Click HERE for the INSTRUCTIONS


Dracu-kin

Holding vampire teeth closed, trace a line around them onto the pumpkin. Use a pumpkin saw to remove the area and enough of the inside for teeth to sit like in picture. Trim 2 red pushpins. Stick them in for eyes.

via

Homemade Goldfish Crackers

Ingredients

  • 1 cup(s) all-purpose flour
  • 4 tablespoon(s) cold unsalted butter, cut into small pieces (I used salted butter, but didn’t add any salt afterward)
  • 8 ounce(s) grated extra-sharp Cheddar cheese (around 2 cups). Note: you can experiment with other cheeses. Some people have tried this and loved the results!
  • 3/4 teaspoon(s) salt
  • 1/8 teaspoon onion powder (note: this is optional since it isn’t part of the original recipe, but I decided to add anyway since I used it)
  • 1/2 teaspoon(s) fresh-ground pepper
  • 1 teaspoon baking powder

Directions

  1. Pulse the flour,onion powder, salt, pepper, and baking powder together using a food processor.
  2. Add the butter and cheese, and pulse until the mixture resembles coarse meal.
  3. Pulse in 3 to 4 tablespoons of water, 1 tablespoon at a time, and only enough so that the dough forms a ball and rides the blade. Remove, wrap in plastic, and chill for 20 minutes (I put it in the freezer for 20 minutes and in the fridge for 10) or up to 24 hours.
  4. Bake the crackers: Heat oven to 350 degrees F. Line 2 baking pans with parchment paper or silicone baking mats and set aside. Roll the dough out to 1/8th-inch thickness, using flour if necessary to prevent stickiness. Cut out as many crackers as possible.
  5. To add character to the fish: break off an end from a side of a toothpick so it is blunt. Use that point to make the goldfish eyes. To make the smile, lay the toothpick down on its side, press, and drag. If you try to use the toothpick point, it will ruin the smile.
  6. Optional: Refrigerate for another 15 minutes or so to make sure they won’t spread.
  7. Place them on the prepared baking pans. Bake until golden and crisp (13-18 minutes). Transfer to a wire rack to cool.
  8. They are best when completely cooled and the next day in my opinion. Store in an airtight container for up to 1 week.

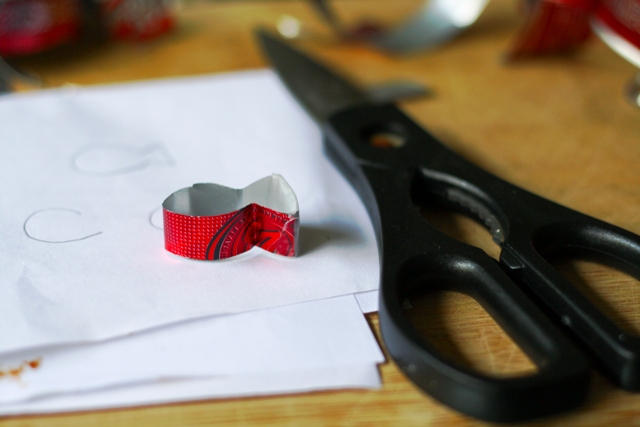
Homemade Goldfish Cracker Cutter

  1. Draw outline of goldfish on a piece of paper for reference. (Mine was about an inch in length)
  2. Take an empty soda can and cut through it horizontally using a sharp knife.
  3. Using your scissors, cut a strip of metal from the soda can (it should be the circumference of the soda can).
  4. Straighten edges with scissors
  5. Using your goldfish paper template, determine how big the head will be and fold both sides outwards accordingly. Don’t fold too harshly or the strip will break. If this happens, just cut off another strip and start again.
  6. Using your template, determine when to fold the tail. Make sure the end of the tail overlaps at some point, and cut off the excess strip if necessary.
  7. Staple or tape or glue the ends of the tail together. (I used tape over the tail).
  8. For more safety, you may put a protective layer of tape over the top part of the fish (the non-cookie cutting side where you’ll be applying the pressure) as a protection against the metal when cutting.   via