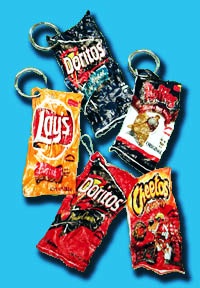
You Need:
- Empty bag of chips (plastic outside, aluminium inside)
- Baking tray x 2 (or oven proof plates)
- Sheets of baking paper x 2 (bigger than the chip bag)
- Towel
- Oven mitts
- Oven
What to do:
- Preheat your oven to 200 degrees Celsius.
- Wash your empty chip bag gently with water and dry with a towel. Crumbs make bumps in the shrinkie, so you really want to start with a clean bag.
- On a baking tray, lay your chip bag flat between two sheets of baking paper. To get a long, flat shrinkie place an oven proof plate or tray on top. If you are after a more scrunched look, do not place the plate/tray weight on top.
- Place the baking trays in the oven for about 10 minutes. Have an adult check it every 2 minutes.
- Have an adult take the tray out of the oven and let it cool. Slowly peel the baking paper apart to reveal your new chip bag shrinkie. via

Is it safe? How about the smell from the plastic?
always run your stove/oven hood fan when ever baking plastics in the oven…common sense…and yes, it’s safe, just don’t stand there and breathe in the smell…common sense once again.
Somehow this doesn’t seem like it would work….what makes it shrink? I guess I’ll try it…
Wow people really have no clue what shrinky dink is…I feel really old now
Me too Valerie! I loved making shrinky dinks when I was young!
Lol me too. My friends an I made these all the time.
mine didn’t work. ;(
Cool idea. I want to try this. Question: What size bag?
Reblogged this on Aimnforheart's Blog and commented:
Thinking about trying this for group.
did you use the full size bags or snack size?
Bag size shouldn’t matter, you just get a larger fob. The fun part is setting your oven to 392 degrees Fahrenheit.
Can I put a sticker on the shrink paper and cut it out will it work.
Um will this really work? What makes the bags shrink? Also, do the chip bags get thicker just like shrink dinks?